Geolocation and mapping in apps
During this lockdown, I wanted to play with new and unfamiliar technology. Enter Flutter. Google’s all new framework for building cross-platform mobile applications.
In many ways, Flutter feels like frontend development reimagined. Gone are HTML markups and CSS styles. Even JavaScript has been done away with in Flutter land.
Instead, what we have is a modern, object-oriented language called Dart which unifies all disparate aspects of traditional frontend development. It even features a hot reload feature which shaves development time significantly, as code changes do not require constant recompiling.
Although young, Flutter seems to be a leap forward in the world of mobile app development. As such, this framework is certainly one to keep an eye on. Personally, I found the quality of documentation and support to be excellent. Google has even made it open source; being able to peek at the implementation of underlying libraries is something I’ve grown to appreciate a lot.
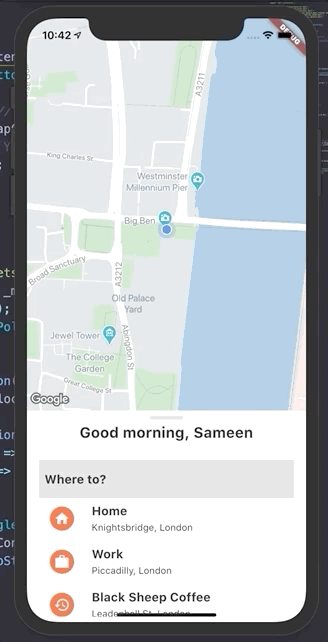
Final Result
Today, we will look at how we can build something like the Uber home screen with a map.
Steps
First, let’s break the task down by visual features, going from top to bottom. We will need a:
- Card which takes up roughly half of screen length
- Loading animation to show before the map loads
- Map with custom colour scheme centered on device current location
Note: I encourage you to follow along and code, but as a reminder, all code is available in my GitHub repository.
Constructing the bottom sheet
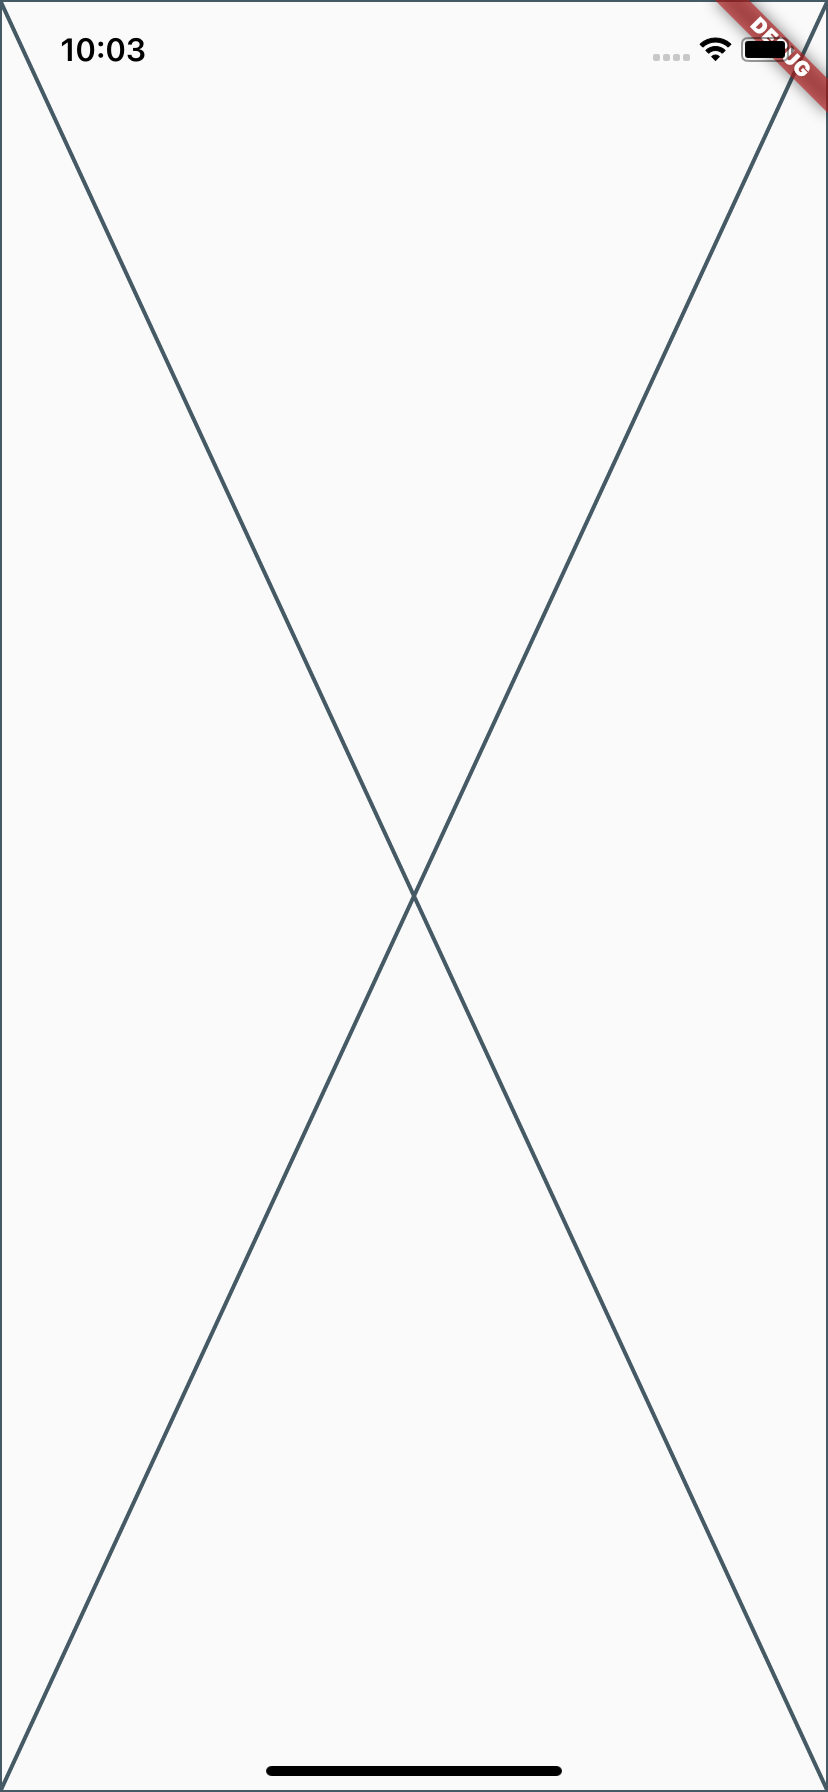
We begin with a blank slate:
lib/main.dart
import 'package:flutter/material.dart';

void main() {
  runApp(MyApp());
}

class MyApp extends StatelessWidget {
  @override
  Widget build(BuildContext context) {
    return MaterialApp(
      title: 'Geo Maps',
      theme: ThemeData(
        accentColor: Color(0xFFFF6238), // Orange, opacity=1.0
        visualDensity: VisualDensity.adaptivePlatformDensity,
      ),
      home: Scaffold(
        body: Placeholder(),
      ),
    );
  }
}
which should look like this:
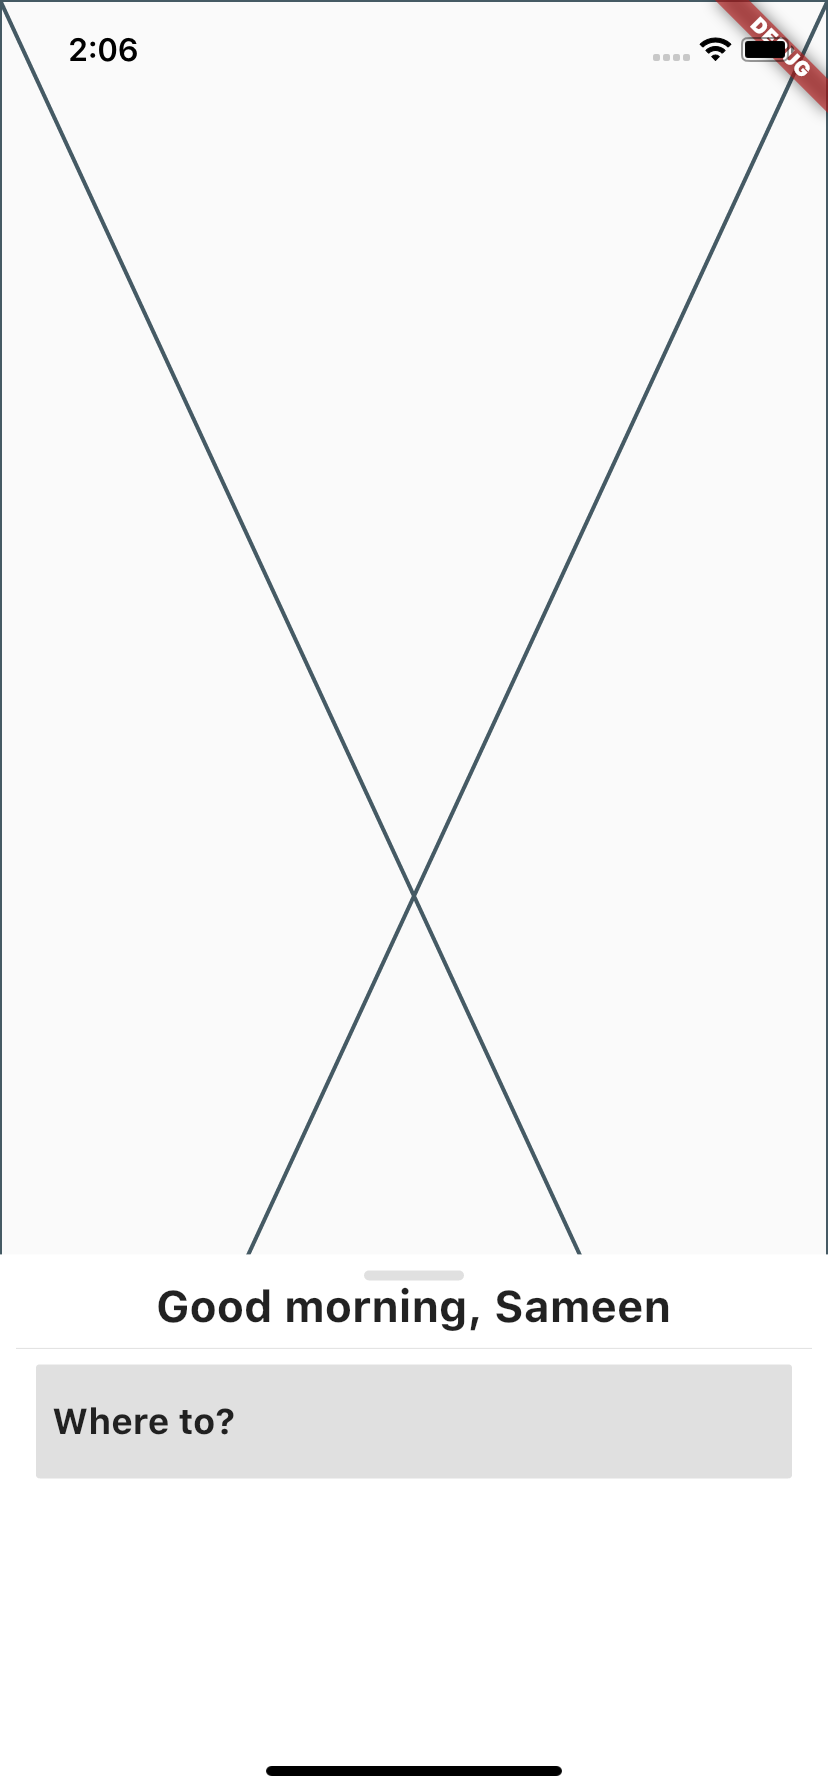
Where to?
Refer back to our final result and notice how the greeting and recent destination list is placed in a sheet that can be pulled vertically. Also notice that it is ‘in front’/’on top’ of the map, so we will need to use a Stack (API Doc) to implement that effect:
lib/main.dart
import 'package:flutter/material.dart';

import 'widgets/where_to_sheet.dart'; // import custom widget

void main() {
  runApp(MyApp());
}

class MyApp extends StatelessWidget {
  @override
  Widget build(BuildContext context) {
    return MaterialApp(
      title: 'Geo Maps',
      theme: ThemeData(
        accentColor: Color(0xFFFF6238),
        visualDensity: VisualDensity.adaptivePlatformDensity,
      ),
      home: Scaffold(
        body: Stack( // new code start
          children: <Widget>[
            Placeholder(),
            DraggableScrollableSheet(
              initialChildSize: 0.3,
              minChildSize: 0.1,
              maxChildSize: 0.3,
              builder: (context, scrollController) {
                return Container(
                  padding: EdgeInsets.all(8.0),
                  color: Colors.amberAccent, // contrast color for debug
                  child: WhereToSheet(), // custom widget
                );
              },
            ),
          ],
        ),
      ), // new code end
    );
  }
}
To improve readability of our build method and to make our code modular, we have created a custom widget which is a child of DraggableScrollableSheet(API Doc). This way, the sheet behaviour code lives with the home screen layout and the layout of the sheet itself is encapsulated within the custom widget WhereToSheet.
Since the sheet will have UI elements distributed vertically, it makes sense to use a Column (API Docs).
lib/widgets/where_to_sheet.dart
import 'package:flutter/material.dart';

class WhereToSheet extends StatelessWidget {
  @override
  Widget build(BuildContext context) {
    return Column(
      crossAxisAlignment: CrossAxisAlignment.center, // centres children horizontally
      children: <Widget>[
        Container( // Handlebar
          height: 5.0,
          width: 50.0,
          decoration: BoxDecoration(
            color: Theme.of(context).dividerColor, // light grey by default on iOS
            borderRadius: BorderRadius.circular(5.0),
          ),
        ),
      ],
    );
  }
}
Et voilà!
Obviously the final design doesn’t have an amber background color, but we’re using it for now to make the region the sheet will cover visible. Change the value to Theme.of(context).cardColor once you’re convinced the sheet exists.
Lost? Refer back to my snapshot to get back on track!
Now, let’s build the ‘Where to?’ button. We know it’s going to be a button and not a TextField because in the original app, tapping this element takes the user to a different screen. We begin with a FlatButton (API Doc) and customise it to suit our needs:
where_to_button.dart
import 'package:flutter/material.dart';

class WhereToButton extends StatelessWidget {
  WhereToButton({@required this.onPressedHandler});

  final Function onPressedHandler;

  @override
  Widget build(BuildContext context) {
    return FractionallySizedBox(
      widthFactor: 0.95,
      child: FlatButton(
        padding: EdgeInsets.symmetric(
          horizontal: 8.0,
          vertical: 14.0,
        ),
        child: Align(
          alignment: Alignment.centerLeft,
          child: Text(
            'Where to?',
            style: TextStyle(
              fontSize: 18.0,
              fontWeight: FontWeight.bold,
            ),
          ),
        ),
        onPressed: onPressedHandler,
        color: Colors.grey[300],
        textColor: Colors.grey[900],
      ),
    );
  }
}
Despite being an object-oriented language, Dart provides first-class support for functions through the Function type(API Doc). Here, we accept a Function onPressedHandler which is simply a callback. This way, we’re free to define the button now as we see fit, and leave the code open to modification later when we actually instantiate the button. This makes sense because what actually happens when the user taps on the button is undefined under the scope of this article.
The most interesting component in this widget is the FractionallySizedBox (API Doc) which basically allows us to say that “make the width of this button 95% than that of its parent container” (which is the width of the Column in where_to_sheet.dart).
Let’s see the results:
Cool, things appear to be taking shape. Now, on to implementing the list of recent destinations.
Recent Destinations List
Begin by creating an object model for a Destination. Looking at the UI mockup, we can see there’s a title and an address line - so we pick those as attributes for the object model.

The idea is, we will create a mock data class which will inject instances of Destination through the constructor of WhereToSheet which we will modify shortly.
lib/model/destination.dart
import 'package:flutter/foundation.dart';

class Destination {
  Destination({@required this.title, @required this.address});

  final String title;
  final String address;
}
In our MockData class, we’re using an UnmodifiableListView (API Doc) to get an immutable view of our private list _destinations - this prevents client code from tampering our private list by accessing its reference through the getter.
lib/mock/mock_data.dart
import 'dart:collection';

import '../model/destination.dart';

class MockData {
  final List<Destination> _destinations = [];

  UnmodifiableListView<Destination> get destinations =>
      UnmodifiableListView(_destinations);

  set addDestination(Destination destination) => _destinations.add(destination);
}
Another important observation to make is that the final keyword doesn’t make our list immutable. It just prevents reassignment, guaranteeing that we’re always going to be working with the same list when interacting with MockData during runtime.
Now is a good time to convert WhereToSheet to a StatefulWidget (API Doc) because we will need to make use of the initState lifecycle method, where we will instantiate some Destination objects and load them up in our MockData.
lib/widgets/where_to_sheet.dart
import 'package:flutter/material.dart';
import 'package:geo_maps/model/destination.dart';

import '../mock/mock_data.dart';
import 'where_to_button.dart';
import 'where_to_recent_dest_list.dart';

class WhereToSheet extends StatefulWidget {
  @override
  _WhereToSheetState createState() => _WhereToSheetState();
}

class _WhereToSheetState extends State<WhereToSheet> {
  final MockData _mockData = MockData();
  List<Destination> _destinations;

  @override
  void initState() {
    super.initState();
    addDummyDestinations();
    _destinations = _mockData.destinations; // get an immutable reference to destinations list.
  }

  // Insert a few destinations to populate our list.
  void addDummyDestinations() {
    // Use setter [addDestination] to push objects into list.
    _mockData.addDestination = Destination(
      title: 'Home',
      address: 'Knightsbridge, London',
    );
    _mockData.addDestination = Destination(
      title: 'Work',
      address: 'Piccadilly, London',
    );
    _mockData.addDestination = Destination(
      title: 'Black Sheep Coffee',
      address: 'Leadenhall St, London',
    );
  }

  @override
  Widget build(BuildContext context) {
    return Column(
      crossAxisAlignment: CrossAxisAlignment.center,
      children: <Widget>[
        Container(
          // Handlebar
          height: 5.0,
          width: 50.0,
          decoration: BoxDecoration(
            color: Theme.of(context).dividerColor,
            borderRadius: BorderRadius.circular(5.0),
          ),
        ),
        Text(
          // Greeting
          'Good morning, Sameen',
          style: TextStyle(
            fontSize: 22.0,
            fontWeight: FontWeight.bold,
          ),
        ),
        Divider(
          color: Theme.of(context).dividerColor,
        ),
        WhereToButton(
          onPressedHandler: () {},
        ),
        WhereToRecentDestList( // Create destination tiles using mock data
          destinations: _destinations,
        ),
      ],
    );
  }
}
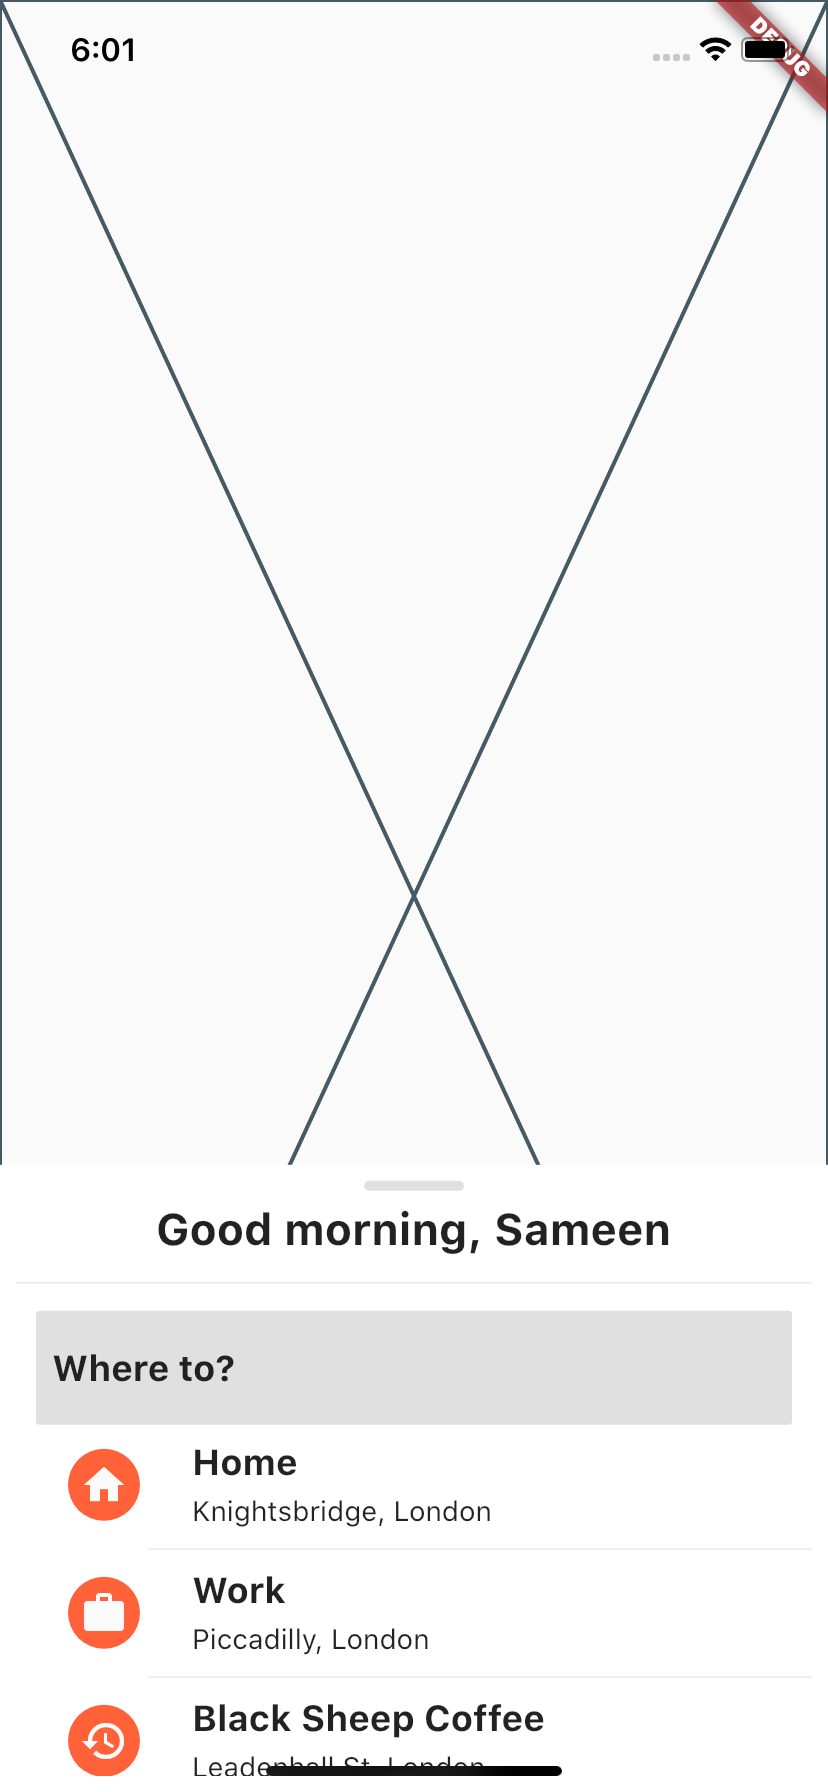
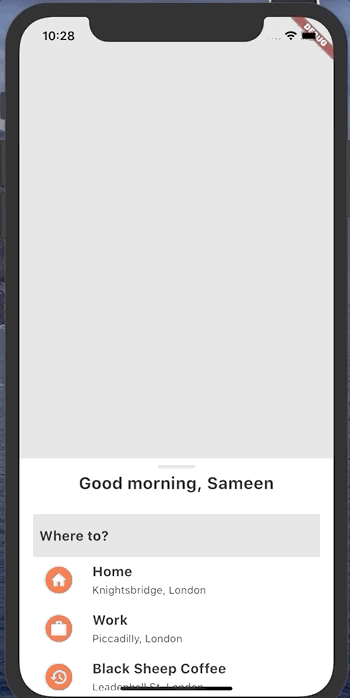
Let’s take a look at our progress so far:
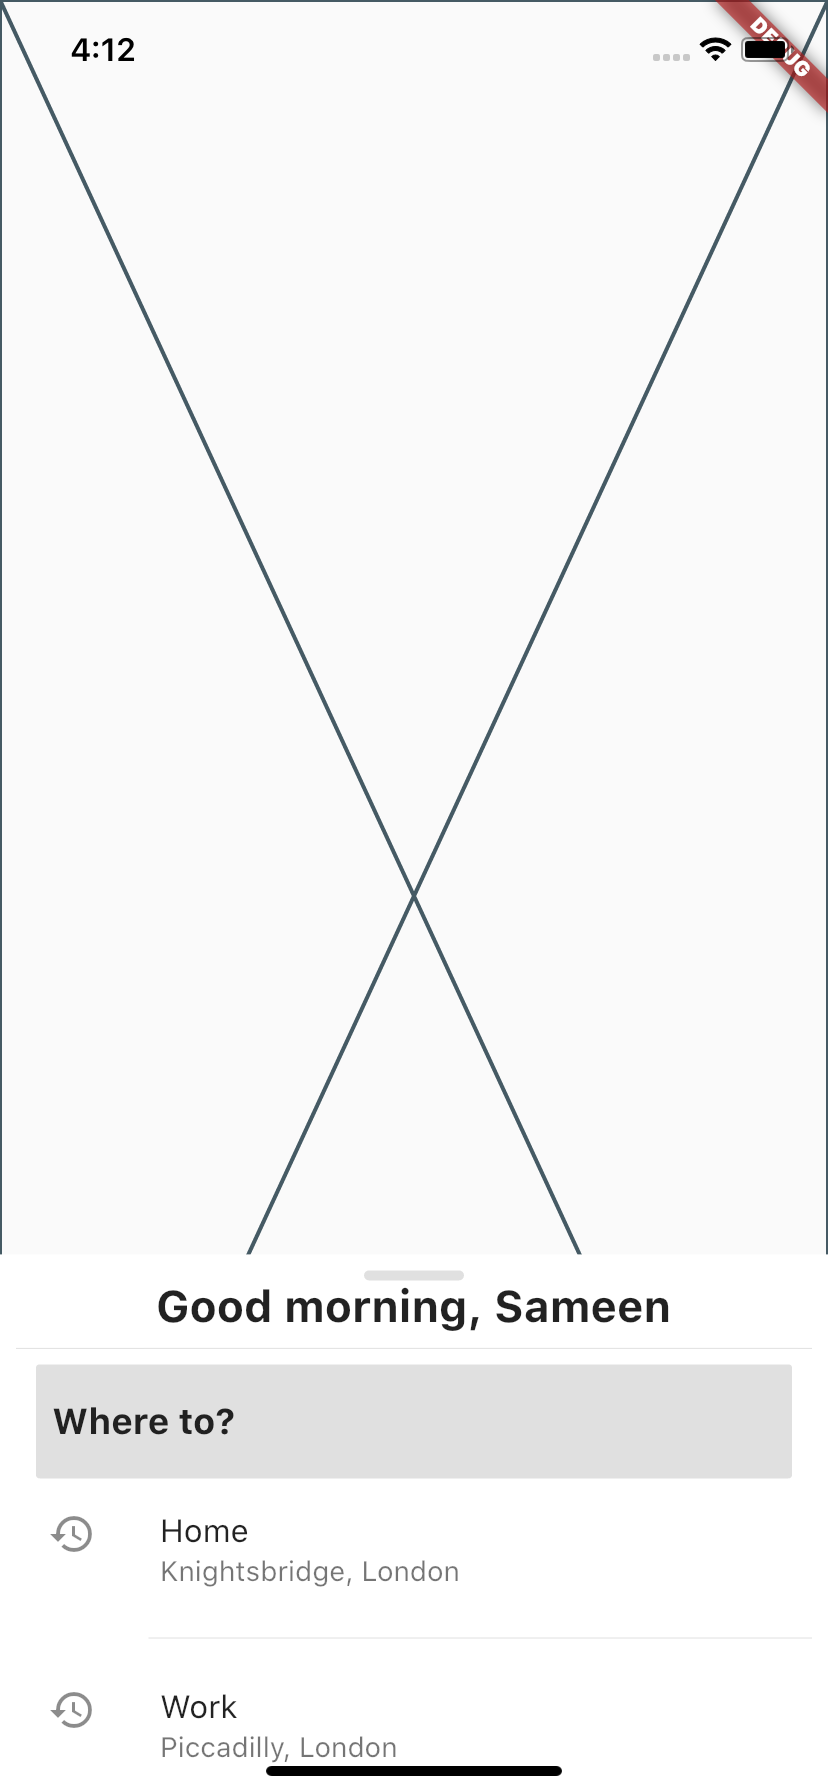
Comparing with our final mockup, we can spot a few discrepancies here:
- Greeting message does not have enough padding
- Recent destination tiles have too much padding
- Icon missing background color and shape
In the next section, we will bring some polish to our app’s look.
Refactoring
Before modifying the code further, it’s worth looking at how we’ve quickly prototyped the recent destination list (as seen in the screenshot above) using Flutter’s built in ListTile (API Doc).
lib/widgets/where_to_recent_dest_list.dart
import 'package:flutter/material.dart';

import '../model/destination.dart';

class WhereToRecentDestList extends StatelessWidget {
  final List<Destination> _destinations;

  @override
  Widget build(BuildContext context) {
    return Expanded(
      // [Expanded] prevents vertical overflow
      child: ListView.separated(
        shrinkWrap: true, // prevent setting height to infinity
        padding: EdgeInsets.all(0), // remove default padding
        separatorBuilder: (context, index) => Divider(
          // 16% of screen width
          indent: MediaQuery.of(context).size.width * 0.16,
        ),
        itemBuilder: (context, index) => ListTile( // this will be refactored
          leading: Icon(Icons.history),
          title: Text(_destinations[index].title),
          subtitle: Text(_destinations[index].address),
        ),
        itemCount: _destinations.length,
      ),
    );
  }
}
Rather than using a ListTile, we will use the more primitive Row and Column widgets to build a similar layout; we refactor this way to afford greater customisation.
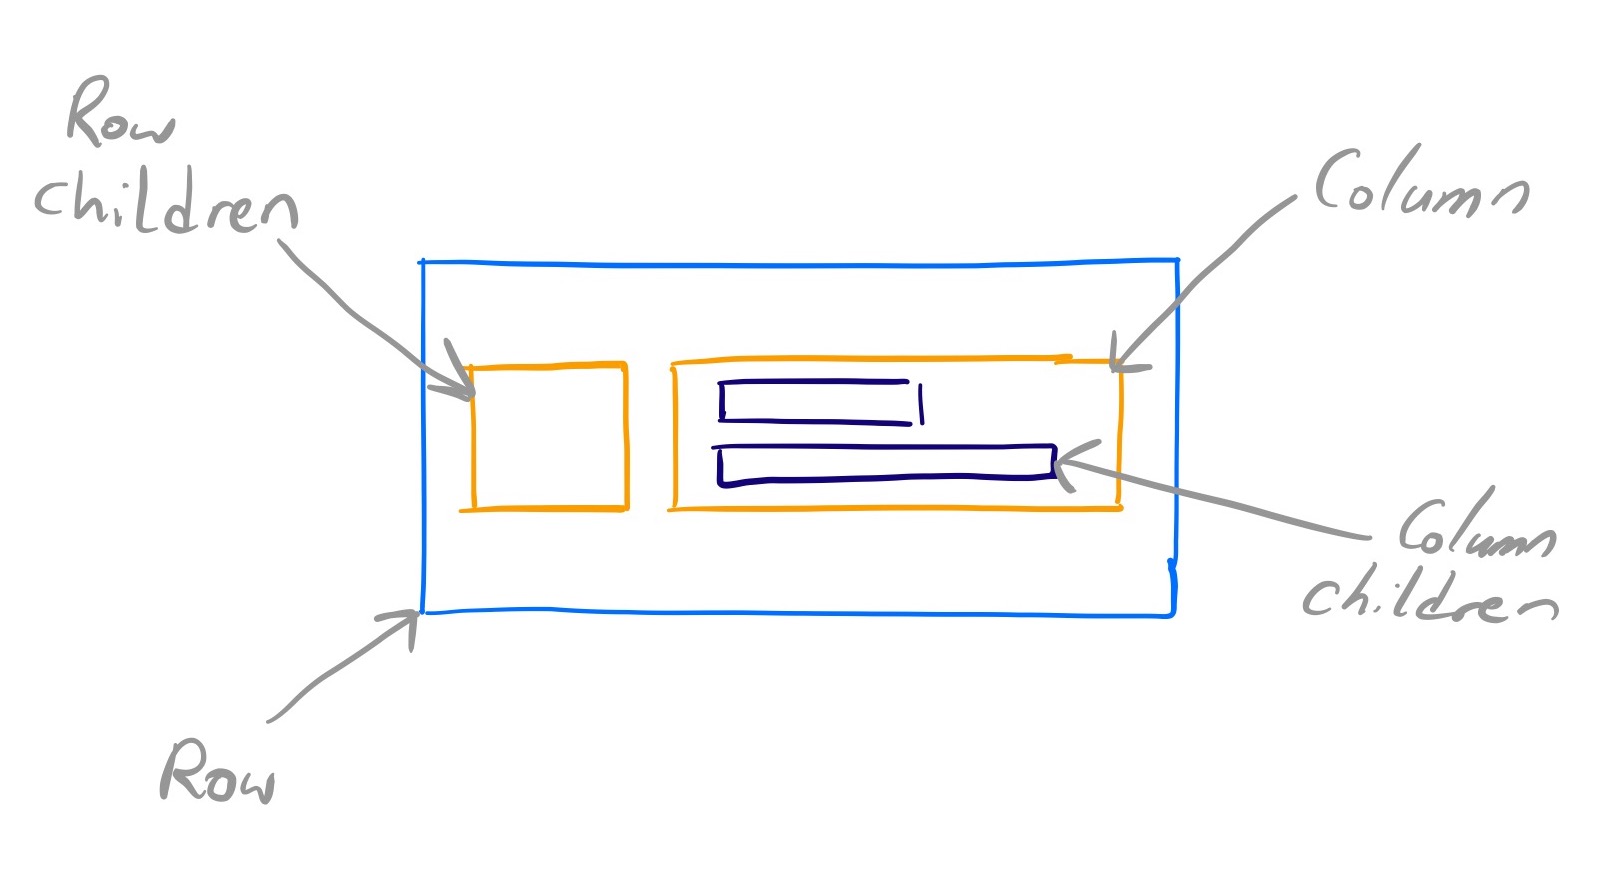
The sketch above translates to the following widget:
lib/widgets/where_to_recent_dest_tile.dart
import 'package:flutter/material.dart';

import '../model/destination.dart';

class WhereToRecentDestTile extends StatelessWidget {
  const WhereToRecentDestTile({
    @required this.destination,
  });

  final Destination destination;

  @override
  Widget build(BuildContext context) {
    return GestureDetector(
      behavior:
          HitTestBehavior.translucent, // includes tapping in 'blank' areas
      onTap: () => print('${destination.title} tapped'),
      child: Row(
        mainAxisAlignment: MainAxisAlignment.start,
        children: <Widget>[
          RawMaterialButton(
            onPressed: null, // disables inkwell effect
            shape: CircleBorder(),
            fillColor: Theme.of(context).accentColor, // orange
            elevation: 0.2,
            child: destination.title.toUpperCase() == 'HOME'
                ? Icon(
                    Icons.home,
                    color: Theme.of(context).canvasColor, // white
                  )
                : destination.title.toUpperCase() == 'WORK'
                    ? Icon(
                        Icons.work,
                        color: Theme.of(context).canvasColor,
                      )
                    : Icon(
                        Icons.history,
                        color: Theme.of(context).canvasColor,
                      ),
          ),
          Column(
            crossAxisAlignment: CrossAxisAlignment.start,
            children: <Widget>[
              Text(
                destination.title,
                style: TextStyle(
                  fontSize: 18.0,
                  fontWeight: FontWeight.bold,
                ),
              ),
              SizedBox(
                height: 6.0, // create space between title and address
              ),
              Text(
                destination.address,
                style: TextStyle(
                  fontSize: 14.0,
                ),
              ),
            ],
          ),
        ],
      ),
    );
  }
}
By wrapping the entire Row in a GestureDetector (API Doc) we’re able to detect taps which will let us progress to the next screen in the future. We’ve also made the list dynamic by conditionally rendering icons depending on the title.
Go back to lib/widgets/where_to_sheet.dart and in the build method add spacing between elements by inserting SizedBox with a small height like this:
// ...
Container(
          // Handlebar
          height: 5.0,
          width: 50.0,
          decoration: BoxDecoration(
            color: Theme.of(context).dividerColor,
            borderRadius: BorderRadius.circular(5.0),
          ),
        ),
        SizedBox(
          height: 6.0, // spacing
        ),
        Text(
          // Greeting
          'Good morning, Sameen',
          style: TextStyle(
            fontSize: 22.0,
            fontWeight: FontWeight.bold,
          ),
        ),
// ...
I’m not adding the full code here again for brevity, but click here to see the full source for this widget.
At this point you may begin to notice the sheet itself may be too small, so you may return to main.dart and tweak the initialChildSize property of DraggableScrollableSheet. I set mine to 0.35.
Caution: Ensure initialChildSize <= maxChildSize to prevent crash.
After these changes, you should be done with the bottom sheet.
Map with custom theme
Let’s integrate Google Maps into our app. We will need an API key, a package dependency and of course, the app skeleton on which the map will be displayed.
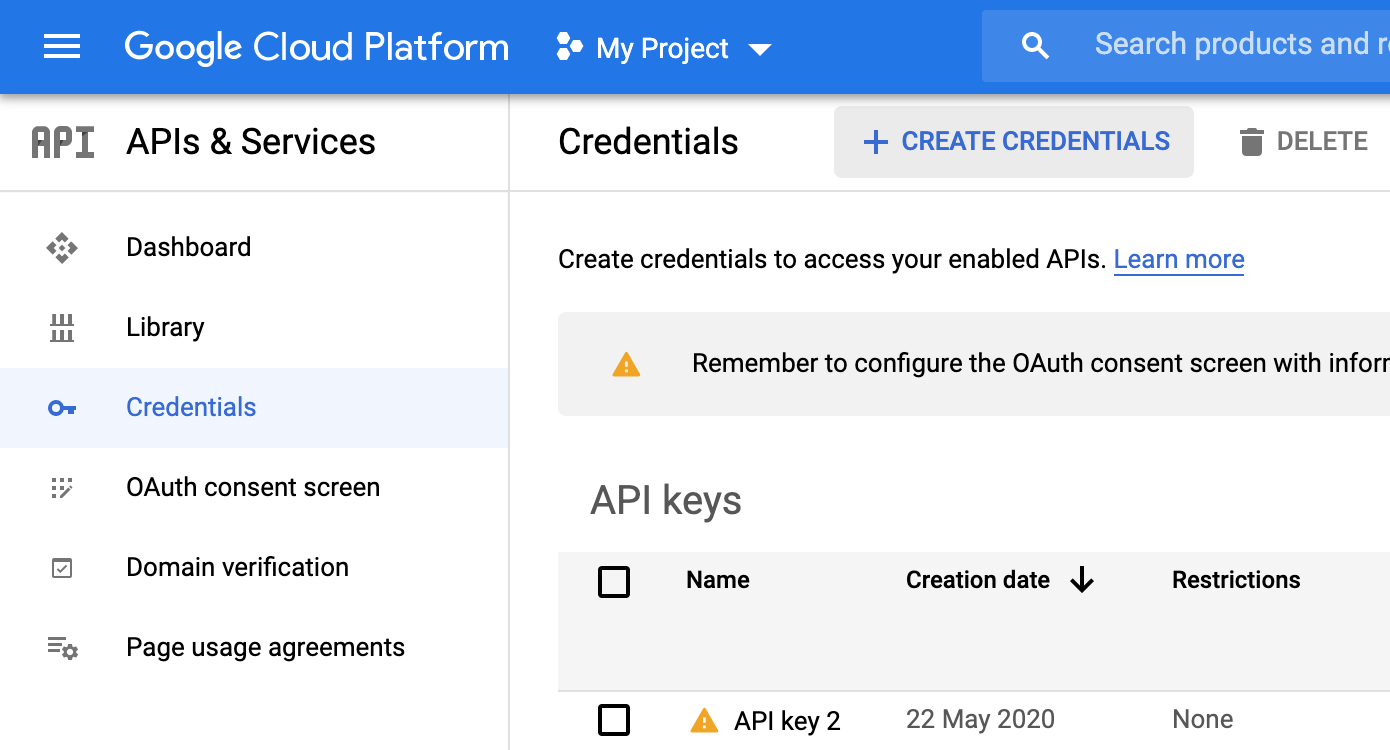
Open the Google Cloud Platform console and navigate to credentials where you will be able to create a new API key. Once done, you should be able to see it under the ‘API Keys’ table (see screenshot below).
Caution: It’s advisable not to share live API keys publicly as others using your key may incur charges on your behalf.
With that out of the way, we now have to activate the Maps SDK so our app will be able to query Google’s map servers. Since Flutter is cross platform, your app could potentialy run on both iOS and Android, so we’ll activate both ‘Maps SDK for iOS’ and ‘Maps SDK for Android’; just use the search bar to find these two products and click on ‘Enable’ under their respective pages to activate.
Project Configuration and Adding Dependencies
pub.dev is the place for all your package needs. If you’re coming from JavaScript world, this is akin to NPM. From pub.dev, we need a package called google_maps_flutter (version ^0.5.28+1 as of writing) which does exactly what it says on the tin
Add this in your pubspec.yaml like so:
dependencies:
  ...
  google_maps_flutter: ^0.5.28+1
Note: yaml files are notorious for being sensitive to indentation, so pay extra attention here.
Now copy and paste the following line with your API key in your Android application manifest (located in android/app/src/main/AndroidManifest.xml):
<meta-data android:name="com.google.android.geo.API_KEY"
               android:value="YOUR KEY HERE"/>
Be sure to place it as the direct child of the <application> tag.
That’s all for Android, now on to iOS.
Open ios/Runner/AppDelegate.swift and replace the file contents with the following code block (but add in your API key of course):
import UIKit
import Flutter
import GoogleMaps

@UIApplicationMain
@objc class AppDelegate: FlutterAppDelegate {
  override func application(
    _ application: UIApplication,
    didFinishLaunchingWithOptions launchOptions: [UIApplication.LaunchOptionsKey: Any]?
  ) -> Bool {
    GMSServices.provideAPIKey("YOUR KEY HERE")
    GeneratedPluginRegistrant.register(with: self)
    return super.application(application, didFinishLaunchingWithOptions: launchOptions)
  }
}
One last thing in this step: the custom theme. Just use the Google Maps Styling Wizard to create or select a predefined theme and copy the generated JSON.
In our case, since we’re looking for an ‘Uber-esque’ theme, we’re going to use this link to copy a similarly structured JSON with different values.
Create a new folder /assets in project root and create a JSON file map_style.json (it doesn’t matter what you name it), pasting in the JSON string you copied from the link above.
Now you have to give your app permission to access this newly created /assets folder. Open pubspec.yaml and scroll down, you should see a commented out section about assets. Uncomment and change so it reads the following:
  assets:
     - assets/
This gives your app access to all files under assets folder, including map_style.json that you just created.
We will come back to this later after creating a skeleton app, so we can apply our style on the rendered map.
Lost? See this and this example to get back on track!
Acquiring Device Location
We’re going to add another dependency called geolocator (version ^5.3.2+2 as of writing) which will determine device location.
Add this in your pubspec.yaml under google_maps_flutter which was an earlier entry you made:
geolocator: ^5.3.2+2
Since device location is a sensitive operation, we need to ask the app user for permission. In iOS, this is configured by adding the following keys in Info.plist file (these should be the direct child of the <dict> tag):
<key>NSLocationWhenInUseUsageDescription</key>
<string>This app needs access to location when open.</string>

<key>NSLocationAlwaysUsageDescription</key>
<string>This app needs access to location when in the background.</string>

<key>NSLocationAlwaysAndWhenInUseUsageDescription</key>
<string>This app needs access to location when open and in the background.</string>
In Android’s case, open android/app/src/main/AndroidManifest.xml and add the following line as a direct child of the top-level <manifest> tag:
<uses-permission android:name="android.permission.ACCESS_FINE_LOCATION" />
Lost? See example to get back on track!
When our screen loads, we want to use Geolocator to get device location. The callback needed for this behavior, initState, is only available in a StatefulWidget. Accordingly, we create a GoogleMapView to sit alongside our DraggableScrollableSheet.
lib/widgets/map_view.dart
import 'package:flutter/material.dart';
import 'package:flutter/services.dart';
import 'package:geolocator/geolocator.dart';

class GoogleMapView extends StatefulWidget {
  @override
  _GoogleMapViewState createState() => _GoogleMapViewState();
}

class _GoogleMapViewState extends State<GoogleMapView> {
  String _mapStyle;
  Position _currentPosition;

  @override
  void initState() {
    super.initState();
    rootBundle
        .loadString('assets/map_style.json')
        .then((value) => _mapStyle = value); // loads custom map theme
    _getCurrentLocation(); // uses geolocator to acquire device position
  }

  void _getCurrentLocation() {
    final Geolocator geolocator = Geolocator()..forceAndroidLocationManager;
    geolocator
        .getCurrentPosition(desiredAccuracy: LocationAccuracy.best)
        .then((position) => setState(() => _currentPosition = position))
        .catchError((e) => print(e));
  }

  @override
  Widget build(BuildContext context) {
    return Container(
      height: MediaQuery.of(context).size.height * 0.65,
      child: Placeholder(),
    );
  }
}
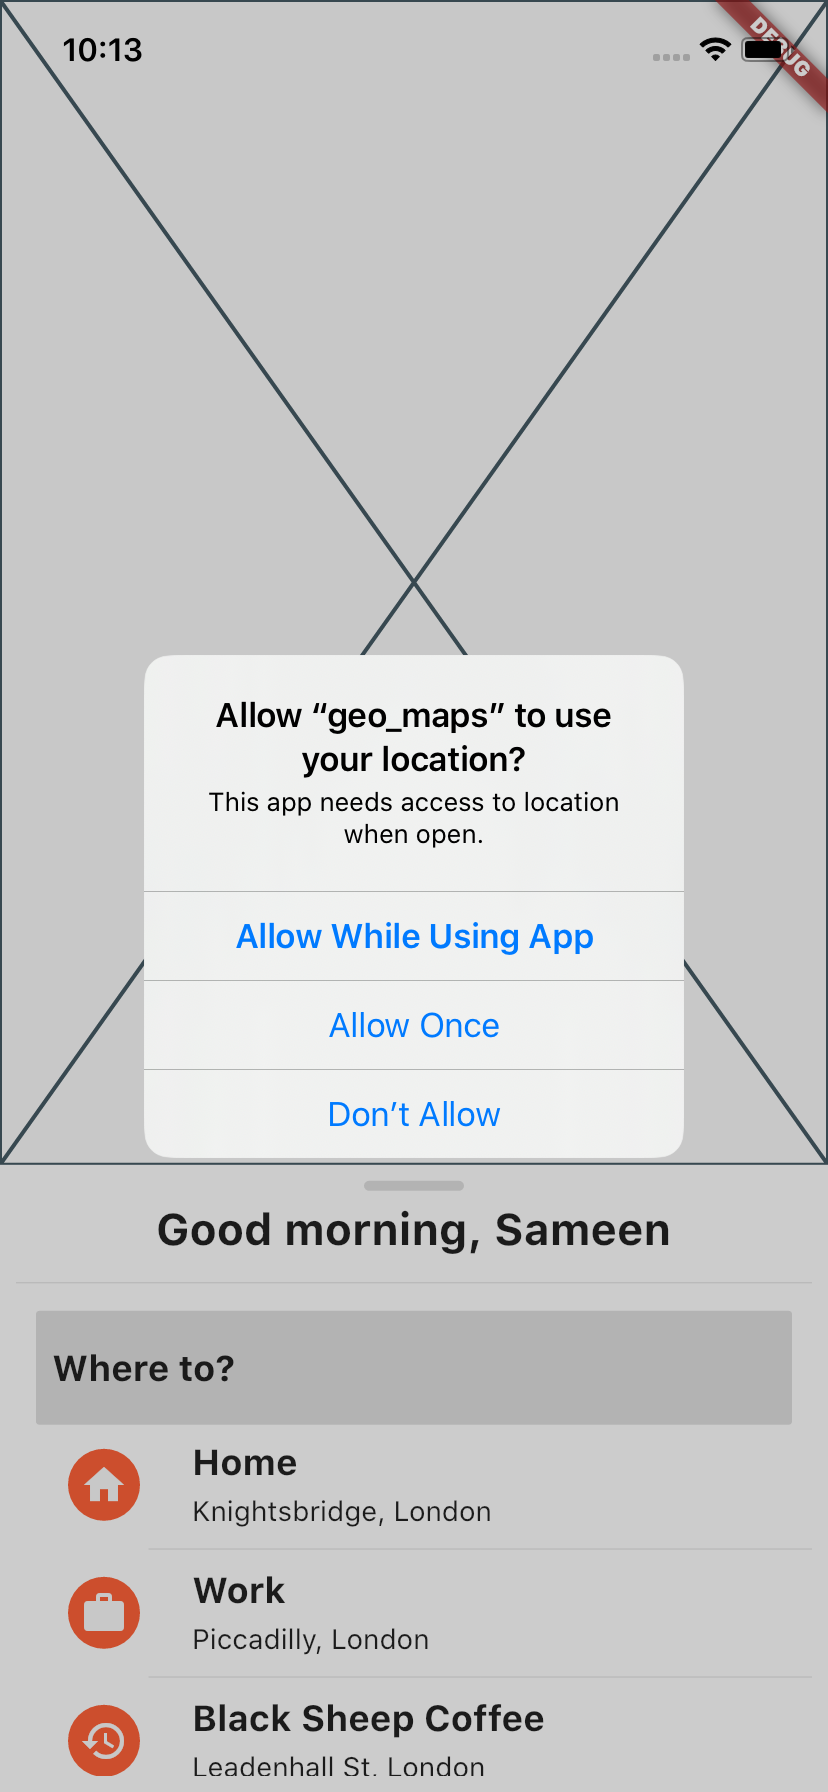
Upon running the app after adding the GoogleMapView widget, you’ll see the standard platform specific location prompt - make sure you accept this.
Add a loading animation
This is a good point to add in the loading animation dependency. While the geolocator package makes an async operation, there will be nothing to display, so we can fill this time with a nice animated loading indicator which can be pulled in using the flutter_spinkit dependency. As of writing, I am using flutter_spinkit: ^4.1.2+1.
Your build method in map_view.dart should read like this after adding in the SpinKitPulse. Notice we use conditional rendering to show the loading blip. We expect the value of _currentPosition to be null until the device acquires good GPS signal and computes current position.
@override
  Widget build(BuildContext context) {
    return Container(
      height: MediaQuery.of(context).size.height *
          0.65, // height (65%) = screen height (100%) - height of bottom card (35%)
      child: _currentPosition == null ? LoadingBlip() : Placeholder(),
    );
  }
where LoadingBlip is the custom widget we just created:
lib/widgets/loading_blip.dart
import 'package:flutter/material.dart';
import 'package:flutter_spinkit/flutter_spinkit.dart';

class LoadingBlip extends StatelessWidget {
  @override
  Widget build(BuildContext context) {
    return Container(
      height: MediaQuery.of(context).size.height * 0.65,
      width: MediaQuery.of(context).size.width * 1,
      color: Colors.grey[300],
      child: SpinKitPulse(
        color: Theme.of(context).indicatorColor,
        size: 50.0,
      ),
    );
  }
}
Feeling lost? Take a look at my commit to get back on track.
Adding the map
Returning to lib/widgets/map_view.dart in build, we now replace the Placeholder with a GoogleMap object which comes from google_maps_flutter dependency.
lib/widgets/map_view.dart
// ...

// Centres map on device location coordinates.
_buildCameraPosition() => CameraPosition(
      target: LatLng(_currentPosition.latitude, _currentPosition.longitude),
      zoom: 16); // positive integers; higher value = more zoom.

// Applies theme to map once it has loaded.
_buildMap(GoogleMapController mapController) =>
      mapController.setMapStyle(_mapStyle);

@override
  Widget build(BuildContext context) {
    return Container(
      height: MediaQuery.of(context).size.height *
          0.65, // height (65%) = screen height (100%) - height of bottom card (35%)
      child: _currentPosition == null
          ? LoadingBlip()
          : GoogleMap(
              myLocationButtonEnabled: false,
              myLocationEnabled: true,
              initialCameraPosition: _buildCameraPosition(),
              onMapCreated: _buildMap,
            ),
    );
  }
// ...
Important: For iOS, it’s crucial you enable embedded views preview by inserting:
info.plist
<dict>
  <!-- Add the following two lines -->
  <key>io.flutter.embedded_views_preview</key>
  <string>YES</string>
  <!-- ... -->
</dict>
Make sure you cold restart the app for the linker to update your changes.
Caution: Check your ios/Runner/AppDelegate.swift and android/app/src/main/AndroidManifest.xml to see you have added your unique API key as detailed in section ‘Project Configuration and Adding Dependencies’ above.
Feeling lost? Take a look at my commit to get back on track.
Summary
If you’ve been able to follow along so far, congratulations! You should have an app with Google Maps integrated with a custom theme with a list of recent destinations as an overlay card - just like Uber!
Thanks for reading!